Photos – Priceless!
January 28, 2012 1 Comment
As professional quilters, I feel that showing off your quilting is EXTREMLY important! How is the world going to know the quality and creativity of your quilting unless you show it off! But how DO you show the world your quilting? There are two ways I would recommend. One way is to have a website or the other way is to have a blog. But, having a website AND a blog is even better yet. They both can complement each other.
A website is a great way of having an internet presence, but …. There are some expenses involved (website name, hosting services, software, webmaster fees, etc.), there can be a learning curve if you do it yourself, and there can be considerable time involved updating the website. If you have someone else working on your website, such as a webmaster, grandchild, high school or college student, son-in-law, etc., you are working on THEIR schedule and you are at their mercy. The important (to you) information or changes that you want on your website is not usually on the top of their priority list. Even if you pay them – and the cost can be significant – there are times when you are still not first on their list. (Ask me how I know this!)
Over the last few years, Blogs have become very popular. If you don’t have a website or you can’t easily work on a website, in my opinion, a Blog is the way to go! Most blogs are FREE, are relatively easy to work on and easy to update. You can work on your blog from any computer that has an internet connection at any time of the day or night. There are several free blog services such as WordPress (which is the service I use for this blog), BlogSpot, TypePad, etc. All of these services have many, many tutorials to get you started.
Note: A book I would recommend for those who don’t have blog yet, or are just starting to work with a blog is “Blogging for Bliss, Crafting Your Own Online Journal”, by Tara Frey. This is a basic book with lots of wonderful photos, references to all sorts of crafting blogs and comparisons of the major blogging services. It is written in a conversational way and is not “geeky” or “tech-y.”
I am not getting into which of these services are “best”, nor is this going to be a “How to get your blog started” article. I want you to learn about blogs and get one of your own started – or at least think about getting one started. It’s not that hard to do!
I feel that every professional quilter should have a blog or a website or both! Why? Let me list the reasons. A blog, a website, or both:
- Give you credibility as a “real” business.
- Let’s the world know that you are open for business.
- Gives the world the chance to see your quilting.
- Let’s your customers, or others, create “conversations” by making comments on your blog posts.
- Is a easy way you can communicate with your customers and potential customers.
It has been said that “having a website lets you talk TO your customers, having a blog lets you talk WITH your customers.”
Note: Even though I have this blog and a personal blog at cindyroth1.wordpress.com I do not consider myself an expert blogger. I am still learning the ins and outs of blogging, but I am having a lot of fun along the way.
Let’s assume you do have a blog and you do post to it every once in a while, but mostly about family or other things. Simply start posting about your quilting. I would recommend making some categories about quilting such as: Customer Quilts, My Quilts, Quilts in Progress, etc. and I would suggest a separate page about your quilting services. (There is a difference between a page and a post, which should be explained in your service’s tutorials.) And here is the most important part – INCLUDE PHOTOS OF QUILTS IN YOUR POSTS!
When your customer brings their quilt to you and you are talking to them during the intake process, ask them if you can post photos of their completed quilt on your blog and make a note of this on your worksheet. If they are reluctant to have their quilt on the internet, that’s all right. Just make sure you note this and respect their wishes.
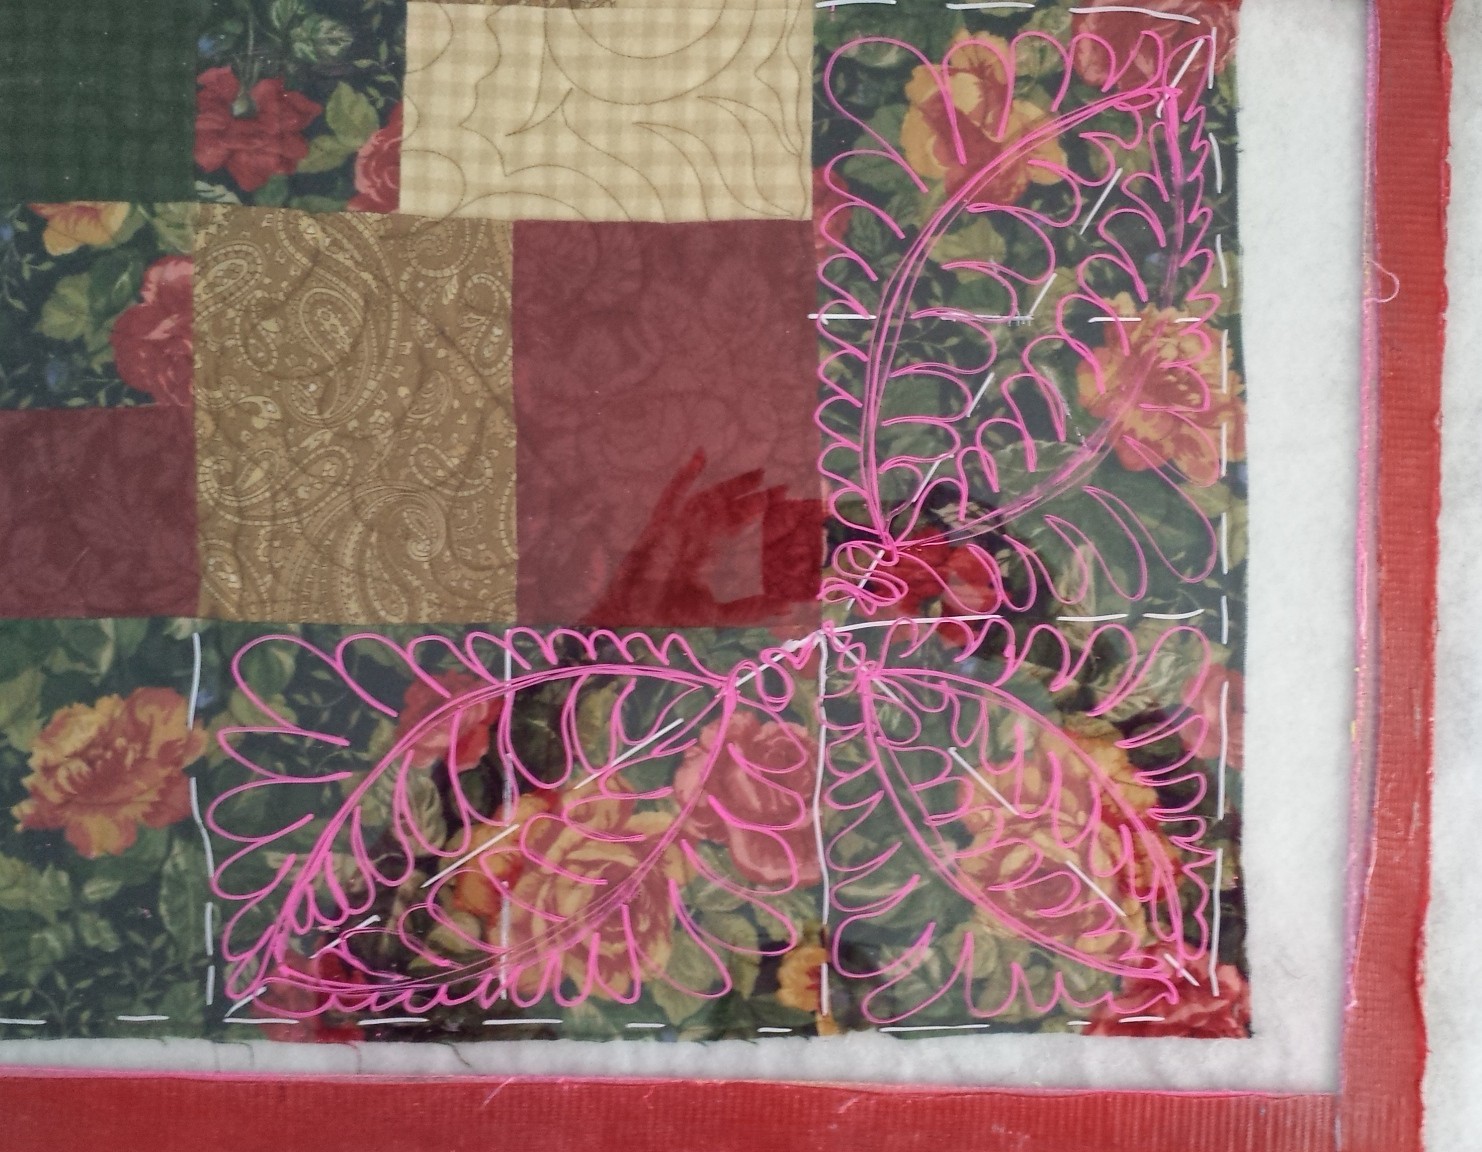
When you have finished quilting their quilt, of course, take photos. Take a full view of the quilt and some close up photos to show the wonderful quilting you did. Before you post the photos on your blog, make sure to take the time to “adjust” the photos by cropping, etc. This is usually easy to do by using the photo editing software that is included on your computer. I like to crop my quilt photos so that no (or very little) background is showing.
For example: When I take photos of my quilts, I like to hang them out on the clothesline in my backyard. In the photos, I usually get a lot of my very overgrown garden showing in the background behind the quilt. (Remember, you have to move the photo from the camera to the computer to “adjust” the photo.) I crop (or remove) as much of the overgrown garden as I can before I post the photo. Remember to “save” the photo after cropping and adjusting!
After the photo is the way you want it, go to your blog and begin writing a “post” about the quilt. You may want to include your customer’s first name and last initial, the name of the piecing pattern, the details of what you quilted on it, etc. Before your publish your post, be sure to upload, then add your photo to the post. (Again, follow the tutorials for your blog service on how to do this.) I would recommend posting a full view of the quilt and at least one or two close up photos of your quilting. After your post is completed, publish your post. Now your quilting is on the internet for the world to see.
Note: depending on how your blog is set up, every time you publish a post, your blog “subscribers” can be automatically notified and then view your quilting photos. How cool is that!
Here is where everything starts coming together! Send an email to your customer letting them know that their quilt is ready to be picked up. Include the web address of your blog post in the email and encourage your customer to view their quilt online. I know that your customer will be thrilled to see the wonderful quilting you did and she will want to forward your blog address to her friends and others. She wants to show off her quilt – and your quilting! You never know where in the world your photos (and your quilting) will be seen!
Let’s assume that a friend of your customer sees the quilt (and your quilting) and contacts you about quilting her quilt! Do you see how this could increase your customer base and your income?
Here is a tip – if your blog service has “tags” be sure to use them. Include the name of the piecing pattern and the name of the designer. Also include tags for the quilting you did, such as feathered wreaths, free motion quilting, etc., or specific names of quilting patterns. If you take the time to do this, when someone does an online search for the name of that piecing pattern, designer, quilting design, etc., your post will be included in their search. Again, you NEVER know who is looking for quilting ideas for a specific piecing pattern or specific designer, and who is looking at YOUR quilting! They may be your next customer!
Take the time to take the photos and post them to your blog. (You can do the same with a website, but a blog is usually a lot easier.) This may be the easiest, most fun way to increase your business!


